All CollectionsHow-to GuidesHow to replace batteries on your Panic Button
The Panic Button Remote is a compact, battery‐ powered, wireless panic button that transmits an Emergency signal from any location within radio frequency (RF) range of the control panel. The signal can be transmitted to the control panel, whether the security system is armed or disarmed. Users can mount the panic button in a convenient location on the wall or use one of these wearable options: lanyard, wristband, belt clip, and car‐visor clip. It is completely water‐resistant and also offers a five (5)‐second button lockout.
You have two options when your sensor reports a low battery:
1. Have an Epic Alarm technician visit you Our customer success team can be reached by email or by phone to schedule a service technician to come out and replace them. There is a charge for a tech to come out. If you have EpicCare warranty coverage in effect, all charges will be waived.
2. Replace them yourself Most sensors have batteries that can be replaced by you. Please call Epic Alarm before replacing sensor batteries yourself, so we can put your account on test.
The following is a list of our most common equipment, followed by the battery type and quantities and the replacement instructions.
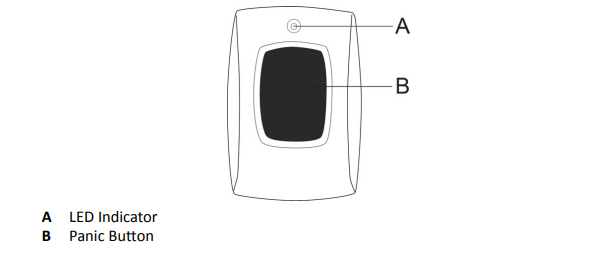
Figure 1: Panic Button Remote
A LED Indicator
B Panic Button
Battery Type
The panic button uses a CR2032 (3V lithium coin cell) battery. Only one battery is required. Under typical use, the battery lasts approximately two years. Always replace the battery with the same or an equivalent type.
Inserting and Replacing the Batteries
WARNING: To be useful in duress situations, it is imperative that you maintain the battery in the panic button. To ensure proper functioning, it is recommended that end users and/or qualified installation personnel check the battery for the panic button regularly, at least one or more times per year. Under typical conditions, the battery life is approximately two (2) years. When the battery is low, the control panel’s Home screen will display a trouble notification. To help to ensure that the panic button is available during a duress event, always replace the battery when the low battery notification first appears.
WARNING: Always use the recommended replacement batteries and ensure that it is new, in good condition, and fully‐charged.
1. Insert a small, flathead screwdriver into the opening on the panic button. Then remove the top cover.
Figure 2: Panic Button Remote—Removing the Top Cover
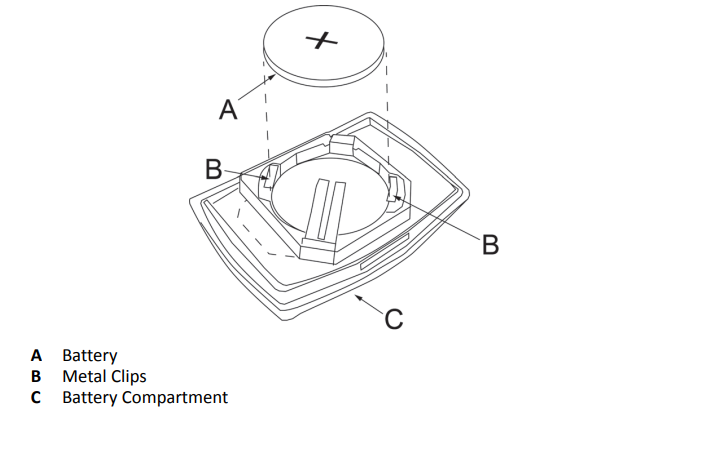
2. Gently insert the flathead screwdriver between the battery and one of the metal clips in the battery compartment. Then remove the old battery.
Figure 3: Panic Button Remote—Battery Compartment
IMPORTANT: Always dispose and/or recycle used batteries in accordance with the hazardous waste recovery and recycling regulations for your location. Your city, state, or country may also require you to comply with additional handling, recycling, and disposal requirements.
3. Insert the replacement battery with the positive (+) sign facing up.
4. If you remove the circuit board (not recommended), ensure the LED aligns with the appropriate hole on the top cover.
5. Verify that the panic button is programmed into the control panel and ensure that it has quality radio frequency (RF) communications with the panel. NOTE: To learn how to program a wireless sensor into the Control Panel, see the Control Panel’s Installation & Programming Guide.
6. Replace the panic button’s top cover.
WARNING: Failure to follow these warnings and instructions can lead to heat generation, rupture, leakage, explosion, fire, or other injury, or damage. Do not insert the battery into the compartment in the wrong direction. Always replace the battery with the same or equivalent type (see Specifications). Never recharge or disassemble the battery. Never place the battery in fire or water. Always keep batteries away from small children. If batteries are swallowed, promptly see a doctor.
WARNING: After replacing the battery, always test the panic button. For testing information, see the Control Panel’s Installation & Programming Guide.
Activating the Panic Button Remote To activate the panic button:
1. Press and hold the panic button for approximately two (2) seconds. When the LED illuminates ``RED, a signal is transmitted to the control panel.
2. When the control panel alarm sounds and the System in Alarm message displays, enter your code to silence the alarm. Any valid user code will silence the alarm. An alarm report is transmitted to the monitoring service. To acknowledge that the alarm report was sent, tap OK.
3. If you want to clear the alarm history on the control panel, tap Clear Alarm History. This places a checkmark in the corresponding box. Then tap OK.